[초급]안드로이드 DataStore 사용방법 A to Z


이전에 안드로이드에서 사용했던
PreferenceDataStore는 API29부터 deprecated되어있다
그 이후 비슷한 SharedPreferen라는 것이 있는데 얘보다 더 좋은 놈이 나왔다
그게 바로
DataStore이다!!
1. 기존의 SharedPreference와 비교했을 때 장단점
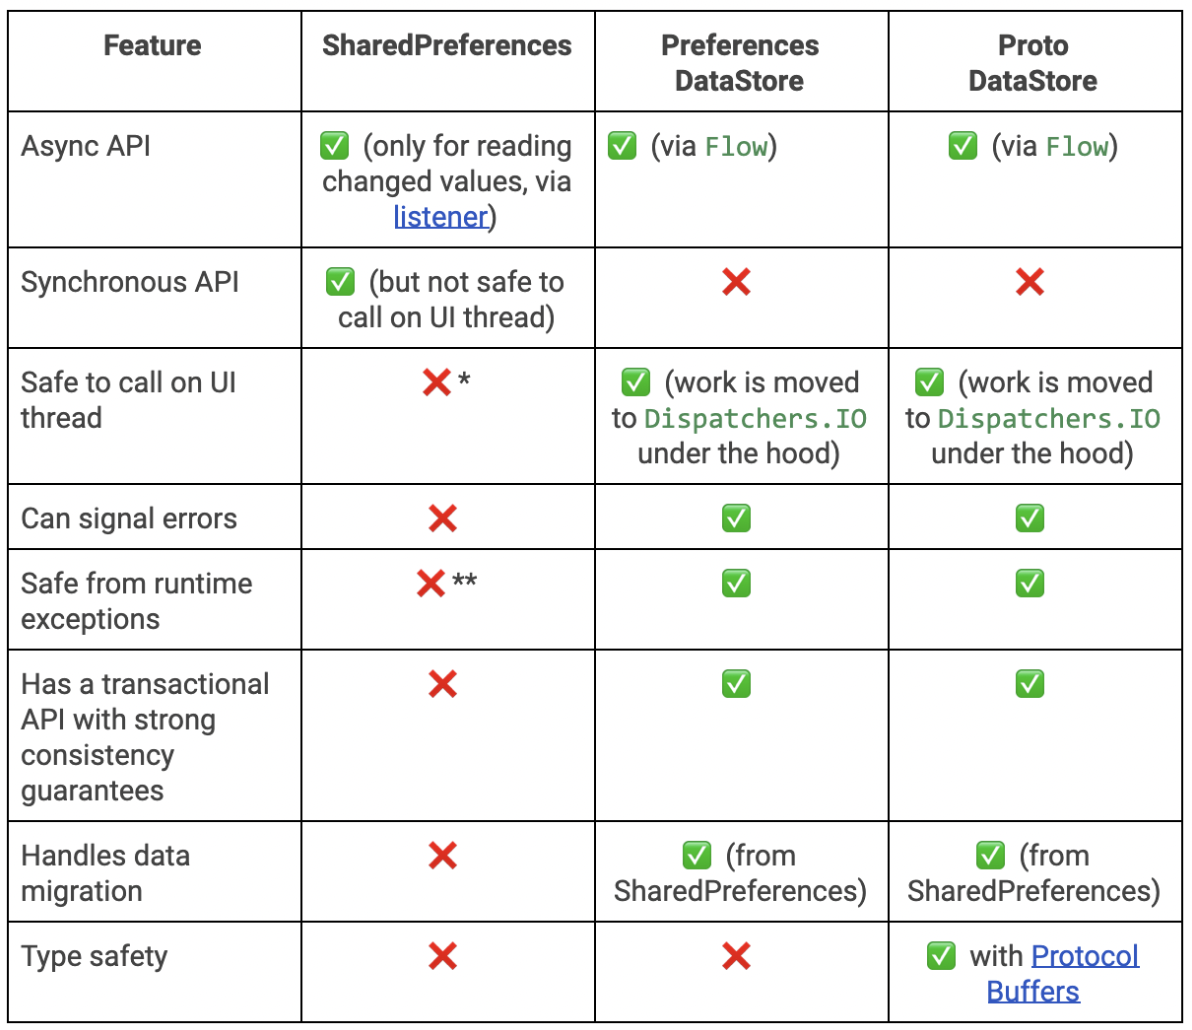
가장 큰 차이점은 다음과 같다
DataStore는 Flow를 통해 데이터를 collect하여 받을 수 있다!
이는 상당히 큰 장점이다
그 이유는 어떠한 데이터를 DataStore를 통해 넣었고
특정 위치에서 해당 데이터를 collect 하고 있었다면
데이터를 저장한 순간 인지할 수 있기 때문이다!
2. 사용방법
https://developer.android.com/jetpack/androidx/releases/datastore?hl=ko
DataStore | Android 개발자 | Android Developers
컬렉션을 사용해 정리하기 내 환경설정을 기준으로 콘텐츠를 저장하고 분류하세요. DataStore 비동기적이고 일관된 트랜잭션 방식으로 데이터를 저장하여 SharedPreferences의 취약점을 극복하세요.
developer.android.com
일단 사용을 하기 위해선 depenedency 정의가 필요하다
dependencies{

    // Preferences Data Store
    implementation "androidx.datastore:datastore-preferences:1.0.0-alpha07"
    implementation "androidx.datastore:datastore-core:1.0.0-alpha07"

    // Preferences Data Store를 사용하기 위해선 Coroutine이 필요함
    implementation 'org.jetbrains.kotlinx:kotlinx-coroutines-android:1.3.9'
}
먼저 DataStore를 사용하기 위한 depenedency 와 코루틴을 사용하기 위한 depenedency 가 필요하다
그럼 이제 사용해보겠다
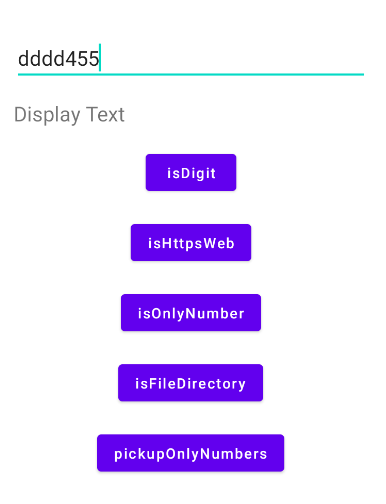
<layout 정의>
먼저 레이아웃은 그림과 같이 대충 정의한다 (참고로 main_activity.xml이다)
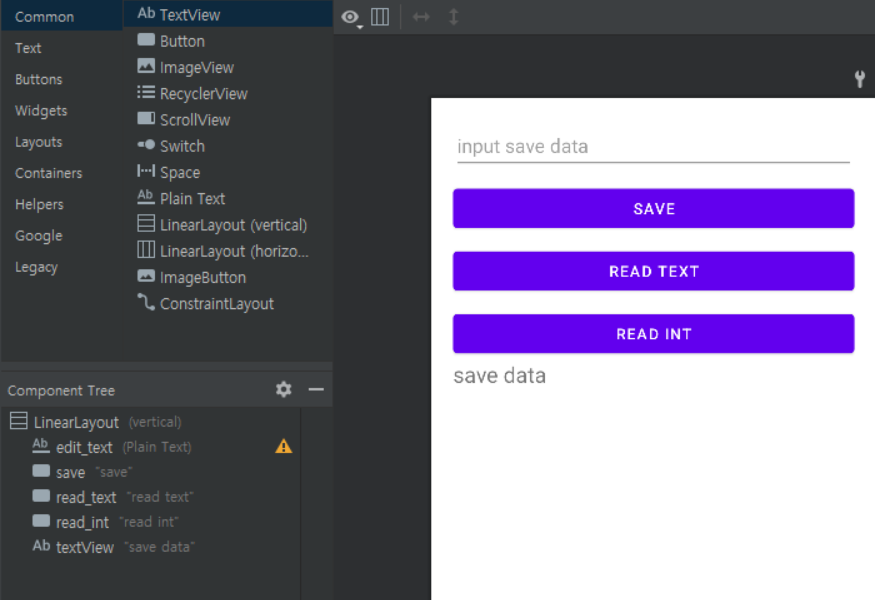
1. EditText에 데이터를 입력한다
2. save 버튼을 통해 dataStore에 입력한 값을 저장한다
3. "READ TEXT", "READ INT"를 통해 데이터를 읽어온다
4. 읽어온 데이터는 TextView에 출력한다
그 다음으로는 MainActivity를 정의한다
<MainActivty.kt>
MainActivity의 전체 코드는 제일 아래에 적어놓겠다
먼저 전역 변수로 DataStore를 컨트롤할 dataStore라는 인스턴트
dataStore의 이름은 보다시피 "settings"로 했다
DataStore를 저장하거나 읽어올 객체를 만든다 = stringKey, numberKey
class MainActivity : AppCompatActivity() {

    private val dataStore: DataStore<Preferences> by preferencesDataStore(name = "settings")
    private val stringKey = stringPreferencesKey("textKey")
    private val numberKey = intPreferencesKey("numberKey")
다음으로
저장 버튼에 대한 정의를 한다
정규식을 사용하여 입력한 값이 String 형태인지 아니면 Int 형태인지 확인한다
(정규식이 뭔지 모른다면?? 아래 링크 참조)
코틀린 안드로이드 정규식(Regex) 활용하기 -기본부터 심화
안드로이드에서 정규식은 주로 회원가입 같이 입력한 값이 특정한 양식을 따르는지 확인할 때 주로 사용됩니다. 1. 기본 개념 및 양식 ^ : 문자열의 시작을 의미. $ : 문자열의 끝을 의미. . : 문
mmol.tistory.com
이렇게 따로 나누어서 저장하는 이유는 Int인지 String인지에 따라 사용해야하는 함수가 다르기 때문이다
(Int는 setInt로 String은 setText로 내가 커스텀한 함수를 사용해서 저장할거기 때문)
DataStore의 저장은 비동기로 이루어지기 때문에 여기서 Coroutine을 사용해야한다
binding.save.setOnClickListener {
            val data = binding.editText.text.toString()
            val regex = Regex("-?\\d+(\\.\\d+)?")

            if (data.isNotEmpty()) {
                CoroutineScope(Dispatchers.Main).launch {
                    if (regex.matches(data)){
                        // 숫자일 경우
                        Log.d("MainActivity", "숫자 저장")
                        setInt(data.toString().toInt())
                    }
                    else {
                        // 문자일 경우
                        Log.d("MainActivity", "문자열 저장")
                        setText(data.toString())
                    }
                }
            } else {
                Toast.makeText(this, "무언가를 입력하세요", Toast.LENGTH_SHORT).show()
            }
        }

private suspend fun setText(text: String) {
    this.dataStore.edit { preferences ->
        preferences[stringKey] = text
    }
}

private suspend fun setInt(number: Int) {
    this.dataStore.edit { preferences ->
        preferences[numberKey] = number
    }
}
다음으로 저장한 데이터를 꺼내본다
여기서 catch를 사용한 이유는 혹시 위에서 찾으려고 하는 dataStore의 이름 "settings"가 없다면
바로 에러를 띄우기 때문이다
그렇기 때문에 값을 저장하지 않고 데이터를 읽으려고 하면 에러가 발생하기 때문에 catch를 사용했다
그리고 map 함수를 사용해서 혹시 해당 preference에 아무 값이 없다면 즉, null이라면 ""을 넣어주게 했다
정상적으로 불러왔다면 textData에는 저장한 String 데이터가 Flow 형태로 들어있을 것이다.
그렇기 때문에 textData를 collect해서 해당 값을 사용할 수 있게된다
Int 부분도 동일하다
binding.readText.setOnClickListener {
        val textData: Flow<String> = this.dataStore.data
            .catch { exception ->
                if (exception is IOException) {
                    emit(emptyPreferences())
                } else {
                    throw exception
                }
            }
            .map { preferences ->
                preferences[stringKey] ?: ""
            }
        CoroutineScope(Dispatchers.Main).launch {
            textData.collect {
                binding.textView.text = it
            }
        }
    }

    binding.readInt.setOnClickListener {
        val intData: Flow<Int> = this.dataStore.data
            .catch { exception ->
                if (exception is IOException) {
                    emit(emptyPreferences())
                } else {
                    throw exception
                }
            }
            .map { preferences ->
                preferences[numberKey] ?: 0
            }
        CoroutineScope(Dispatchers.Main).launch {
            intData.collect {
                binding.textView.text = it.toString()
            }
        }
    }
}
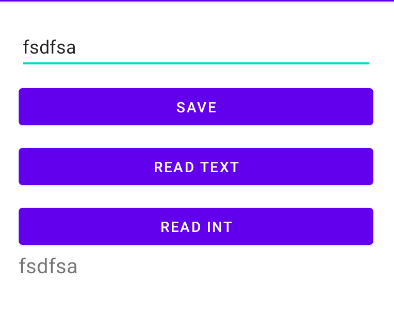
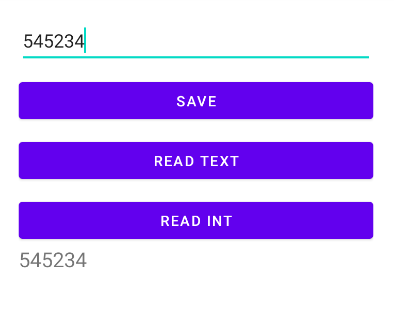
<결과>
3. MainActivity의 전체 코드
import android.os.Bundle
import android.util.Log
import android.widget.Toast
import androidx.appcompat.app.AppCompatActivity
import androidx.datastore.core.DataStore
import androidx.datastore.preferences.core.*
import androidx.datastore.preferences.preferencesDataStore
import com.example.selftest.databinding.ActivityMainBinding
import kotlinx.coroutines.CoroutineScope
import kotlinx.coroutines.Dispatchers
import kotlinx.coroutines.flow.Flow
import kotlinx.coroutines.flow.catch
import kotlinx.coroutines.flow.collect
import kotlinx.coroutines.flow.map
import kotlinx.coroutines.launch
import java.io.IOException

class MainActivity : AppCompatActivity() {

    private val dataStore: DataStore<Preferences> by preferencesDataStore(name = "settings")
    private val stringKey = stringPreferencesKey("textKey")
    private val numberKey = intPreferencesKey("numberKey")
    private val booleanKey = booleanPreferencesKey("booleanKey")

    private lateinit var binding: ActivityMainBinding

    override fun onCreate(savedInstanceState: Bundle?) {
        super.onCreate(savedInstanceState)
        binding = ActivityMainBinding.inflate(layoutInflater)
        setContentView(binding.root)

        binding.save.setOnClickListener {
            val data = binding.editText.text.toString()
            val regex = Regex("-?\\d+(\\.\\d+)?")

            if (data.isNotEmpty()) {
                CoroutineScope(Dispatchers.Main).launch {
                    if (regex.matches(data)) {
                        // 숫자일 경우
                        Log.d("MainActivity", "숫자 저장")
                        setInt(data.toString().toInt())
                    } else {
                        // 문자일 경우
                        Log.d("MainActivity", "문자열 저장")
                        setText(data.toString())
                    }
                }
            } else {
                Toast.makeText(this, "무언가를 입력하세요", Toast.LENGTH_SHORT).show()
            }
        }

        binding.readText.setOnClickListener {
            val textData: Flow<String> = this.dataStore.data
                .catch { exception ->
                    if (exception is IOException) {
                        emit(emptyPreferences())
                    } else {
                        throw exception
                    }
                }
                .map { preferences ->
                    preferences[stringKey] ?: ""
                }
            CoroutineScope(Dispatchers.Main).launch {
                textData.collect {
                    binding.textView.text = it
                }
            }
        }

        binding.readInt.setOnClickListener {
            val intData: Flow<Int> = this.dataStore.data
                .catch { exception ->
                    if (exception is IOException) {
                        emit(emptyPreferences())
                    } else {
                        throw exception
                    }
                }
                .map { preferences ->
                    preferences[numberKey] ?: 0
                }
            CoroutineScope(Dispatchers.Main).launch {
                intData.collect {
                    binding.textView.text = it.toString()
                }
            }
        }
    }

    private suspend fun setText(text: String) {
        this.dataStore.edit { preferences ->
            preferences[stringKey] = text
        }
    }

    private suspend fun setInt(number: Int) {
        this.dataStore.edit { preferences ->
            preferences[numberKey] = number
        }
    }
}
이상입니다!
"이 포스팅은 쿠팡 파트너스 활동의 일환으로, 이에 따른 일정액의 수수료를 제공받습니다."
'IT 관련 지식 > 안드로이드 개발' 카테고리의 다른 글
| 안드로이드 recyclerView에서 setHasFixedSize 역할 (0) | 2022.07.25 |
|---|---|
| 코틀린 안드로이드 정규식(Regex) 활용하기 -기본부터 심화 (0) | 2022.07.24 |
| 안드로이드 에뮬레이서 밖에서 or 안에서 실행하기 (0) | 2022.05.14 |
| WorkManager에서 suspend 함수 사용 시 두 번 호출 문제 (0) | 2022.05.11 |
| 안드로이드 특정 에뮬에서만 애드몹 안나올 때 해결!!! (0) | 2021.01.18 |